Building Console
Introduction
The 389 Management Console as it is used in 389 Directory Server is truly made up of multiple pieces.
The 389 Management Console application itself is really much more than just a Java application. It was designed as a toolkit that can be extended to manage many different server applications. It provides many common Java classes that can be used to manage new applications.
389 Directory Server users are most familiar with is the 389 Directory Server Console. This is made up of all of the panels that allow to you manage your 389 Directory Server; basically it’s what comes up when you open up a 389 Directory Server instance from the topology panel. The 389 Directory Server Console is loaded by the 389 Management Console application.
Tools you need
- Apache Ant 1.6.2 or later
- Java SDK 1.6 (openjdk recommended)
- git 1.5 or later (to pull the source from our SCM)
- GNU tar
- gzip
In general, you’ll need to have the tools listed above in your PATH for your operating system. You should also have ANT_HOME and JAVA_HOME set appropriately for your system.
Components you need
These are built into Fedora. jss is part of EL5, and ldapjdk is available from jpackage.org
- jss - Java Security Services - A Java/JNI wrapper around Mozilla NSS
- NSPR - see Building for information about this Mozilla component
- NSS - see Building for information about this Mozilla component
- There are pre-built binary packages of JSS available from here - as of Jan 4 2008 the latest version is 4.2.5
- If you need to build JSS from source, see JSS Build Instructions for more information.
- See also the Fedora JSS RPM spec file
- ldapjdk - The Mozilla LDAP Java API
- If this is not available on your system, you can try the jpackage.org RPM here
Console components
- IDM Console Framework - this is the core console framework shared by all of the identity management projects such as directory server and certificate system
- 389 Console - this contains the 389-console script used to run the console, and a jar file containing 389 branding and versioning
- 389 Directory Server Console - the files that plug-in to the console framework used to manage directory servers
- 389 Administration Server Console - the files that plug-in to the console framework used to manage administration servers
Building
Source
The sources for the 4 console components listed above can be found at Source - this has source tarballs and CVS information.
Building the Console Framework (idm-console-framework)
Use Ant
ant -Dbuilt.dir=/path/to/built/dir \
[-Dldapjdk.local.location=/path/to/ldapjdk.jar/dir] \
[-Djss.local.location=/path/to/jss4.jar/dir]
- built.dir - all class files and jar files created during the build process will be put in this directory - the default is ../built
- ldapjdk.local.location - the directory containing the file ldapjdk.jar at build time - the default is /usr/share/java
- jss.local.location - the directory containing the file jss4.jar at build time - the default is /usr/lib/java
If all goes well during the build, the Console Framework jar files will end up in the “%{built.dir}/release/jars” directory. There is no “install” ant build target, so you must copy these jar files to their runtime location:
cp %{built.dir}/release/java/jars/idm-console-*.jar /path/to/runtime/jar/dir
You can also build html Javadoc API documentation by issuing the following command
cd console
ant -Dbuilt.dir=/path/to/built/dir javadoc
The Javadoc html files will be located in “%{built.dir}/doc”.
Building the 389 Console (389-console)
Use Ant
ant -Dbuilt.dir=/path/to/built/dir \
  -Dlib.dir=/path/to/shared/lib/dir \
  -Dclassdest=/path/to/jar/file/dir \
  [-Dldapjdk.local.location=/path/to/ldapjdk.jar/dir] \
  [-Djss.local.location=/path/to/jss4.jar/dir]
- built.dir - all class files and jar files and the 389-console shell script created during the build process will be put in this directory - the default is ../built
- lib.dir - this is the directory which contains the JSS, NSS, and NSPR shared libraries at runtime - the default is /usr/lib, but this will not be correct on 64-bit systems (which usually use /usr/lib64 or /usr/lib/64 or something like that) - so you will have to explicitly specify this on 64-bit systems
- NOTE: There is currently no way to have different runtime directories for JSS, NSS, and NSPR - all of those shared libraries must be either found in the same directory (specified by lib.dir), or be available in the system dynamic library loader path
- classdest - the location of the framework and 389-console jar files at runtime - default is /usr/share/java
- ldapjdk.local.location - the directory containing the file ldapjdk.jar at runtime - the default is /usr/share/java
- jss.local.location - the directory containing the file jss4.jar at runtime - the default is /usr/lib/java
If all goes well during the build, the files will end up in the “%{built.dir}” directory. There is no “install” ant build target, so you must copy these jar files to their runtime location:
cp %{built.dir}/*.jar /path/to/runtime/jar/dir
cp %{built.dir}/389-console /path/to/runtime/bin/dir
Building Directory Server Console (389-ds-console)
To build the Directory Server Console, simply fire off Ant
cd ds-console
ant -Dbuilt.dir=/path/to/built/dir \
  -Dconsole.location=/path/to/console/framework/jars/dir \
  [-Dldapjdk.location=/path/to/ldapjdk.jar/dir]
- directoryconsole - the top directory of the source tree
- built.dir - all class files and jar files created during the build process will be put in this directory - the default is ../built
- console.location - the directory containing the console framework (idm-console-framework) jar files - the default is /usr/share/java
- ldapjdk.location - the directory containing the file ldapjdk.jar - the default is /usr/share/java
- _datadir - /usr/share
If all goes well during the build, the files will end up in the “%{built.dir}/package” directory. There is no “install” ant build target, so you must copy these jar files to their runtime location:
cp %{built.dir}/package/389-ds* /path/to/runtime/jars/dir
The way the console works is that it downloads the directory server jar files from the admin server. If you want to use it this way, do this:
cp %{built.dir}/package/389-ds* %{_datadir}/dirsrv/html/java

cp /home/user1/source/built/package/389-ds* /usr/share/dirsrv/html/java
If you just want to run the directory console locally, you’ll need to copy these jars to your local directory:
cp %{built.dir}/package/389-ds* $HOME/.389-console/jars

cp /home/user1/source/built/package/389-ds* /home/user1/.389-console/jars/

You may need to rename the new jar file to match/overwrite the existing jar file name in /home/user1/.389-console/jars/
If you need the help files too, you’ll have to:
cp %{built.dir}/help/en/*.html %{_datadir}/dirsrv/manual/en/slapd
cp %{built.dir}/help/en/tokens.map %{_datadir}/dirsrv/manual/en/slapd
cp %{built.dir}/help/en/help/*.html %{_datadir}/dirsrv/manual/en/slapd/help
Building the Administration Server Console (389-admin-console)
To build the Administration Server Console, simply fire off Ant
cd admservconsole
ant -Dbuilt.dir=/path/to/built/dir \
  -Dconsole.location=/path/to/console/framework/jars/dir \
  [-Dldapjdk.location=/path/to/ldapjdk.jar/dir]
- built.dir - all class files and jar files created during the build process will be put in this directory - the default is ../built
- console.location - the directory containing the console framework (idm-console-framework) jar files - the default is /usr/share/java
- ldapjdk.location - the directory containing the file ldapjdk.jar - the default is /usr/share/java
- _datadir - /usr/share
If all goes well during the build, the files will end up in the “%{built.dir}/package” directory. There is no “install” ant build target, so you must copy these jar files to their runtime location:
cp %{built.dir}/package/389-admin* /path/to/runtime/jars/dir
The way the console works is that it downloads the admin server jar files from the admin server. If you want to use it this way, do this:
cp %{built.dir}/package/389-admin* %{_datadir}/dirsrv/html/java
If you just want to run the directory console locally, you’ll need to copy these jars to your local directory:
cp %{built.dir}/package/389-admin* $HOME/.389-console/jars
If you need the help files too, you’ll have to:
cp %{built.dir}/help/en/*.html %{_datadir}/dirsrv/manual/en/admin
cp %{built.dir}/help/en/tokens.map %{_datadir}/dirsrv/manual/en/admin
cp %{built.dir}/help/en/help/*.html %{_datadir}/dirsrv/manual/en/admin/help
Using Eclipse
If you are doing any sort of non-trivial Console development or debugging, Eclipse can be very useful - http://www.eclipse.org/
You will definitely need the pre-requisites above, and the IDM console framework, 389-console and directory console code - you only need the admin console code if you plan to work on the admin server specific parts of the UI.
Once you get the source code, create a new project in Eclipse for idm-framework. Add the jss4.jar and the ldapjdk.jar to your project build and run classpath. Create new projects for 389-console, admin-console, and the ds-console.
In the 389-console directory that you cloned from git, do this:
$ mkdir bin # may already exist
$ cd bin
$ ln -s ../com
This will put the “branded” text and images into the default classpath.
In the idm-console-framework directory that you cloned from git, do this:
$ mkdir bin # may already exist
$ ant -Dbuilt.dir=bin prepare_build
$ cp ./src/com/netscape/management/client/console/versioninfo.properties\
 bin/com/netscape/management/client/console
The ds-console and admin-console classes will not work without the version information - they will throw an exception.
For running, the main class is “com.netscape.management.client.console.Console”
For the run arguments - there is a special flag to tell Eclipse to use the local versions of the classes - by default the Console will attempt to download the ds and as jar files from the admin server - use the flag “-D nojars” to tell the console to first look for the classes in the local ClassLoader.
I would also suggest the use of these arguments to the Console class as well “-x nologo -a http://localhost:9830/ -u admin -w yourpassword”
Walkthrough
Get the source
$ mkdir $HOME/source
$ cd $HOME/source
$ git clone ssh://git.fedorahosted.org/git/idm-console-framework.git
$ git clone ssh://git.fedorahosted.org/git/389/console.git
$ git clone ssh://git.fedorahosted.org/git/389/admin-console.git
$ git clone ssh://git.fedorahosted.org/git/389/ds-console.git
Prepare the console source
$ cd $HOME/source/console
$ mkdir bin  # may already exist
$ cd bin
$ ln -s ../com
Prepare the idm-console-framework source
$ cd $HOME/source/idm-console-framework
$ mkdir bin  # may already exist
$ ant -Dbuilt.dir=bin prepare_build
$ cp ./src/com/netscape/management/client/console/versioninfo.properties\
 bin/com/netscape/management/client/console
Launch Eclipse and setup the projects
Setup the idm-console-framework project
- Create a project for idm-console-framework: File -> New -> Java Project
- Set the project name, and do NOT use the default location. Instead set the location to the top of your git repositiory for the idm-console-framework: $HOME/source/idm-console-framework/
- Click “Next”
- Under the Libraries tab, add external jars
- /usr/lib64/jss/jss4.jar
- /usr/share/java/ldapjdk.jar
- Click “Finish”
Setup the admin-console project
- Create a project for admin-console: File -> New -> Java Project
- Set the project name, and do NOT use the default location. Instead set the location to the top of your git repositiory for the admin-console: $HOME/source/admin-console/
- Click “Next”
- Under the Projects tab, add the idm-console-framework project
- Under the Libraries tab, add external jars
- /usr/lib64/jss/jss4.jar
- /usr/share/java/ldapjdk.jar
- Click “Finish”
Setup the ds-console project
- Create a project for ds-console: File -> New -> Java Project
- Set the project name, and do NOT use the default location. Instead set the location to the top of your git repositiory for the ds-console: $HOME/source/ds-console/
- Click “Next”
- Under the Projects tab, add the idm-console-framework project
- Under the Libraries tab, add external jars
- /usr/lib64/jss/jss4.jar
- /usr/share/java/ldapjdk.jar
- Click “Finish”
Setup the console project
- Create a project for console: File -> New -> Java Project
- Set the project name, and do NOT use the default location. Instead set the location to the top of your git repositiory for console: $HOME/source/console
- Click “Finish”
Setup the Eclipse “Run/Debug Configuration”
- Right click the idm-console-framework project -> Properties -> Run/Debug Settings -> New -> Select “Java Application”
- Set the Main Class to “com.netscape.management.client.console.Console”
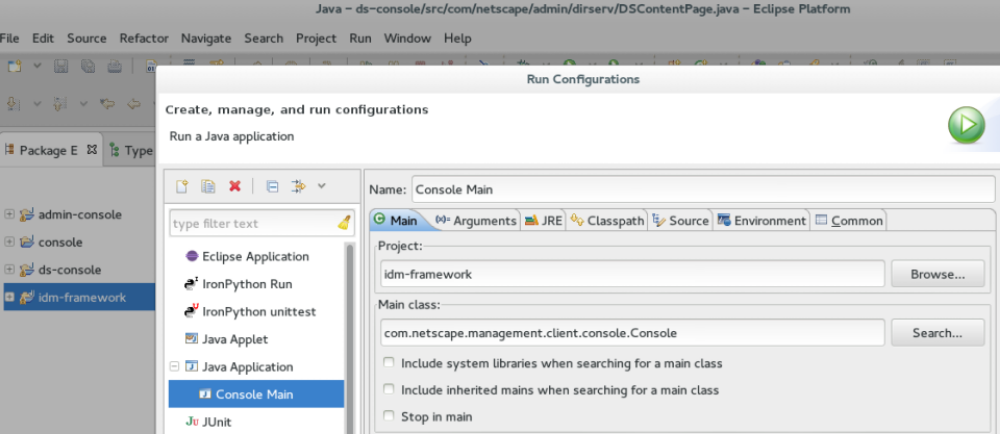
- Under the Arguments tab, add something like: “-D nojars -x nologo -a http://localhost:9830/ -u admin -w PASSWORD”
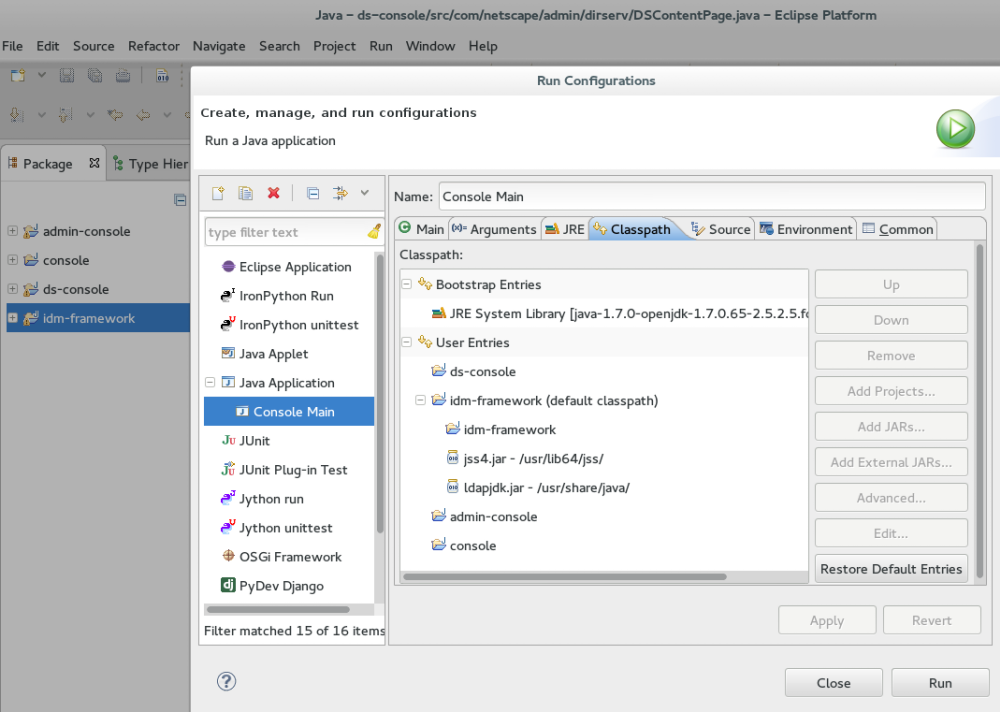
- Under the Classpath tab, select User Entries, and then Add Projects
- Add the admin-console, ds-console, and console projects
- Click “OK”
- If idm-console-framework is listed twice, remove the one that is not “expandable”
- Click “Apply”
Run/Debug the console
- From the menu: Run -> “Run Configurations…” or “Debug Configurations…”
- Run Configurations -> simply runs the application
- Debug Configuration -> runs the application in debug mode (follows breakpoints, step through code, etc).
-
Click Run or Debug depending on the what configfuration you chose -> this will launch the console
- Note - after any source change you must “rebuild” the project before those changes are reflected. Preferably choose: Project -> “Clean…”, select the checkbox to Start a build immediately, and select Build the entire workspace, and click “Ok”.
Using NetBeans
The NetBeans setup is very similar to the eclipse setup. We will setup separate “Java Project with Existing Sources” projects for 389-console, 389-admin-console, 389-ds-console, and idm-console-framework.
Get the source
$ mkdir $HOME/source
$ cd $HOME/source
$ git clone ssh://git.fedorahosted.org/git/idm-console-framework.git
$ git clone ssh://git.fedorahosted.org/git/389/console.git
$ git clone ssh://git.fedorahosted.org/git/389/admin-console.git
$ git clone ssh://git.fedorahosted.org/git/389/ds-console.git
Prepare the console source
$ cd $HOME/source/console
$ mkdir bin  # may already exist
$ cd bin
$ ln -s ../com
Prepare the idm-console-framework source
$ cd $HOME/source/idm-console-framework
$ mkdir bin  # may already exist
$ ant -Dbuilt.dir=bin prepare_build
$ cp ./src/com/netscape/management/client/console/versioninfo.properties\
 bin/com/netscape/management/client/console
Launch NetBeans
Setup the projects
Do this for idm-console-framework, console, admin-console, and ds-console
- Create a project for idm-console-framework: File -> New Project -> Java Project with Existing Sources
- Set the project name.
- Click “Next”
- Add the source package folder for this project
- Click “Finish”
Set the Build Libraries
Do this for the console, admin-console, and ds-console projects
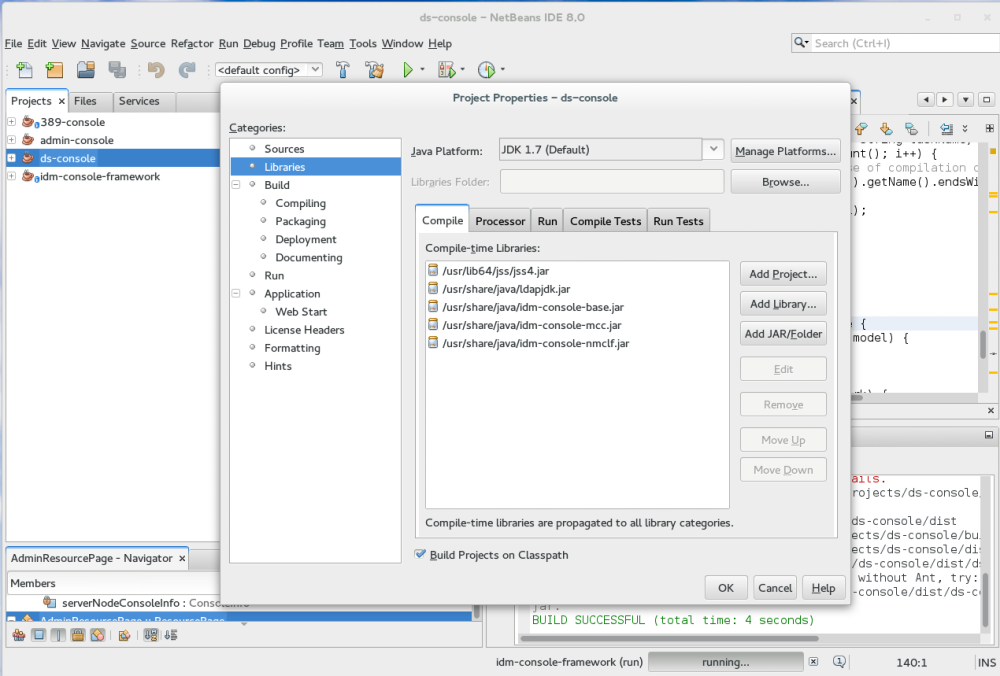
- Right-click on the project and select “Properties”
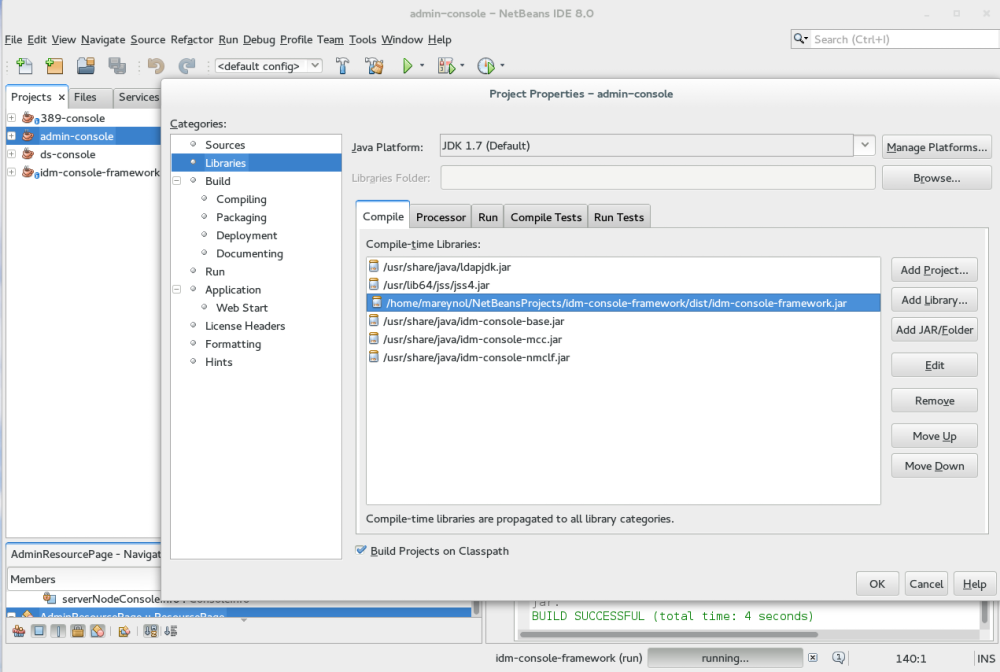
- Select “Libraries” from the list on the left
- Select the “Compile” tab
- Next, “Add Jar/Folder” and add the following jar files
- /usr/lib64/jss/jss4.jar
- /usr/share/java/ldapjdk.jar
- /usr/share/java/idm-console-base.jar
- /usr/share/java/idm-console-mcc.jar
- /usr/share/java/idm-console-nmclf.jar
Later, we will add /home/USER/NetBeansProject/idm-console-framework/dist/idm-console-frame.jar if we need to test changes to the idm-console-framework project.
Configure the idm-console-framework project
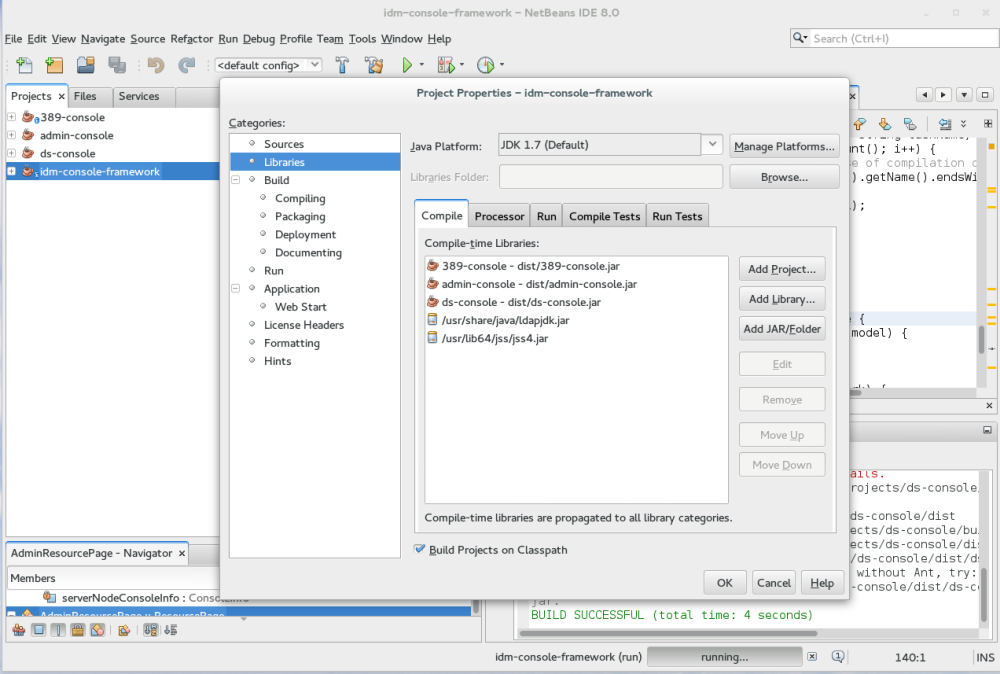
- Right-click on the project and select “Properties”
- Select “Libraries” from the list on the left
- Select the “Compile” tab
- Next, “Add Jar/Folder” and add the following jar files
- /usr/lib64/jss/jss4.jar
- /usr/share/java/ldapjdk.jar
- Next, “Add Project…” and the other projects: console, admin-console, and ds-console
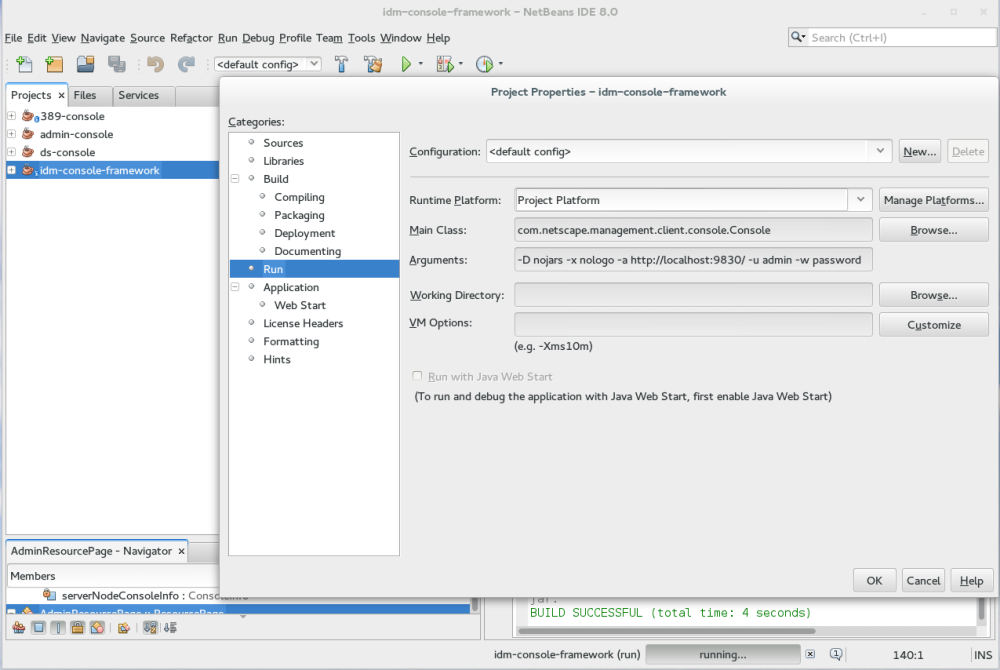
- Select Run from the list on the left
- Set the Main Class, “Browse” for com.netscape.management.client.console.Console
- Set the Arguments to: -D nojars -x nologo -a http://localhost:9830/ -u admin -w password
- Click “Ok”
Build the Projects
Select Run from the NetBeans IDE menu, and then Build Project (idm-console-framework). This should build all the projects, and this is why we had to add the /usr/share/java/idm-console-framework*.jar files to the console, admin-console, and ds-console properties, because we build the subprojects first, and there is no idm-console-framework.jar yet.
Once we do this initial build we can go back and add /home/USER/NetBeansProject/idm-console-framework/dist/idm-console-framework.jar to the console, admin-console, and ds-console project libaries. Make sure this jar file is at the top of the list of jar files. Note, this step is only necessary if you have updated the idm-console-framework project.*
Running/Debugging the Console
Now that everything is built, simply choose Run or Debug from the NetBeans menu, do not forget to set your breakpoints.